目次
前回記事
以下になります。
本記事の目標
- ボットをAzure OpenAIに接続出来るようにコードを書く
- ローカル環境での動作確認
開発環境
ローカルPCで必要となる環境を記載します。
- Windows11
- VSCode
- Node.js 18.16
- Bot Framework Emurator(ローカルでBotの動作を確認する際に必要になります)
Bot Framework Emuratorは以下からダウンロードします。
公式
公式の手順は以下になります。
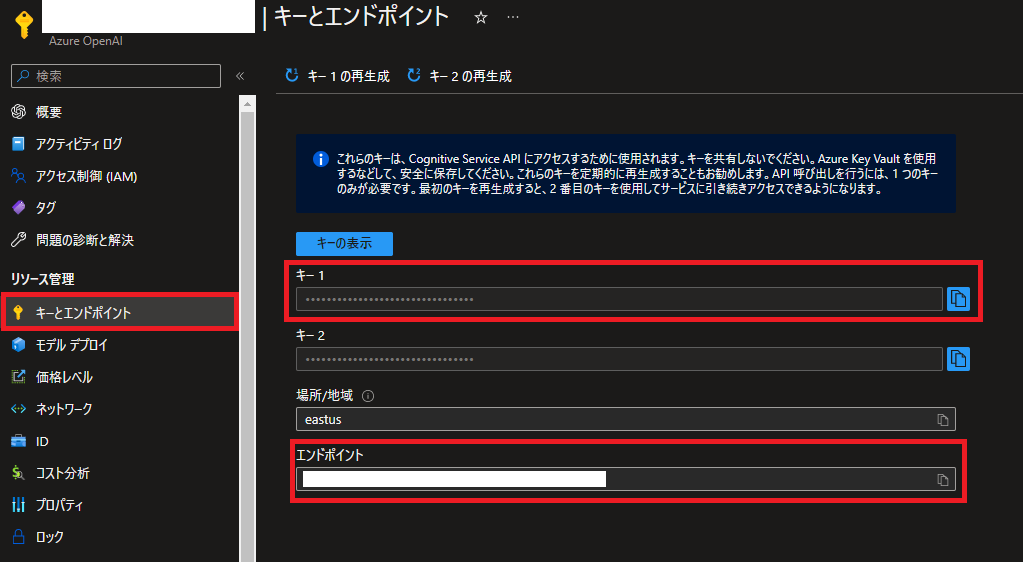
Azure OpenAIの接続情報
以下が必要となります。
- APIキー
- エンドポイント
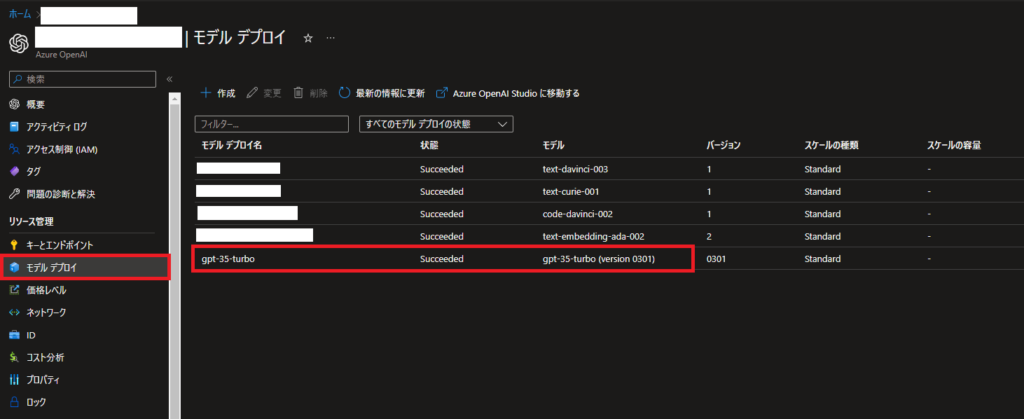
- デプロイ名
- モデル名
今回はgpt-35-turbo (version 0301)になります
開発していく
テンプレートのダウンロードなど
基本的に公式の手順に沿えば問題なくテンプレートのダウンロードまでは完了します。
テンプレートを作成する際の値はデフォルトにしました。
PS> yo botbuilder

Welcome to the Microsoft Bot Builder generator v4.17.0.

Detailed documentation can be found at https://aka.ms/botbuilder-generator

? What's the name of your bot? my-chat-bot
? What will your bot do? Demonstrate the core capabilities of the Microsoft Bot Framework
? What programming language do you want to use? JavaScript
? Which template would you like to start with? Echo Bot - https://aka.ms/bot-template-echo
? Looking good.  Shall I go ahead and create your new bot? (Y/n)
yoでスクリプトエラーが発生した場合
PS> yo botbuilder
yo : このシステムではスクリプトの実行が無効になっているため、ファイル C:\U
sers\<User>\AppData\Roaming\npm\yo.ps1 を読み込むことができません。詳細につ
いては、「about_Execution_Policies」(https://go.microsoft.com/fwlink/?Link
ID=135170) を参照してください。
発生場所 行:1 文字:1
もし上記エラーが出た場合は以下コマンドを実行すると一時的にスクリプトの実行ポリシーを変更することが可能です。
PS> Set-ExecutionPolicy -ExecutionPolicy RemoteSigned -Scope ProcessAzure OpenAIと通信して値を持ってくる
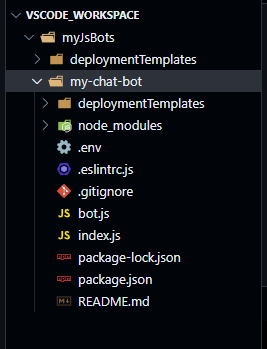
テンプレートのダウンロードが完了すると以下のようにファイルが生成されているはずです。
Azure OpenAIに接続するには別途ライブラリが必要となります。
以下コマンドを実行します。
PS> npm install azure-openaibot.jsを編集します。
今回はシンプルにAzure OpenAIのGPT-3.5 turbo(世間的にはChatGPTと呼ばれているやつ)にリクエストを送って、その戻り値をそのまま返すだけです。
// Copyright (c) Microsoft Corporation. All rights reserved.
// Licensed under the MIT License.

const path = require('path');
const dotenv = require('dotenv');

// Import required bot configuration.
const ENV_FILE = path.join(__dirname, '.env');

dotenv.config({ path: ENV_FILE });

const { ActivityHandler, MessageFactory } = require('botbuilder');
const { Configuration, OpenAIApi } = require("azure-openai");

const configuration = new Configuration({
    apiKey: this.apiKey,
    // add azure info into configuration
    azure: {
       apiKey: process.env.AZURE_OPENAI_API_KEY,
       endpoint: process.env.AZURE_OPENAI_ENDPOINT,
       // deploymentName is optional, if you donot set it, you need to set it in the request parameter
       deploymentName: process.env.AZURE_OPENAI_DEPLOYMENT_NAME,
    }
});

const modelName = process.env.AZURE_OPENAI_MODEL_NAME || "gpt-35-turbo (version 0301)"
const setupMessage = {"role":"system","content":"You are an AI assistant that helps people find information."}

const openai = new OpenAIApi(configuration);

class OpenAiBot extends ActivityHandler {

    constructor() {
        super();

        // See https://aka.ms/about-bot-activity-message to learn more about the message and other activity types.
        this.onMessage(async (context, next) => {
            let replyText = ""
            try {
                const response = await this.createChatResponseFromOpenAi(context.activity.text);
                console.log(response.data.choices[0]);
                replyText = `${ response.data.choices[0].message["content"] }`;
                console.log(`Prompt Tokens: ${response.data.usage["prompt_tokens"]} | Completion Tokens: ${response.data.usage["completion_tokens"]} | Total Tokens: ${response.data.usage["total_tokens"]}`);
                console.log(`Create Reponse Text: ${response.data.choices[0].message["content"].replace(/(\r\n|\n|\r)/gm, "")}`);

            } catch (error) {
                if (error.response) {
                    console.log(error.response.status);
                    console.log(error.response.data);
                    replyText = `エラーが発生しました。もう1回試してみてね。詳細:${error.response.data}`;
                } else {
                    console.log(error.message);
                    replyText = `エラーが発生しました。もう1回試してみてね。詳細:${error.message}`;
                }
              } finally {
                  await context.sendActivity(MessageFactory.text(replyText, replyText));
                  // By calling next() you ensure that the next BotHandler is run.
                  await next();
              }
        });

        this.onMembersAdded(async (context, next) => {
            const membersAdded = context.activity.membersAdded;

            const welcomeText = `こんにちは。my-chat-bot - ${modelName}です。`;

            for (let cnt = 0; cnt < membersAdded.length; ++cnt) {
                if (membersAdded[cnt].id !== context.activity.recipient.id) {
                    await context.sendActivity(MessageFactory.text(welcomeText, welcomeText));
                }
            }

            // By calling next() you ensure that the next BotHandler is run.
            await next();
        });
    }

    async createChatResponseFromOpenAi(text) {
        return await openai.createChatCompletion({
            model: modelName,
            messages: [setupMessage].concat({role: "user", content: text}),
            temperature: 1,
            top_p: 0.9,
            presence_penalty: 0,
            frequency_penalty: 1,
            max_tokens: 512,
        });
    }
}

module.exports.OpenAiBot = OpenAiBot;
セットアップメッセージ(どういう役割でメッセージを返すかの設定とか)を設定していたりします。
実際にリクエストを送る際にこのメッセージを先頭に付与しています。この使い方が正しいかは分らないですが。今度もう少し調べてみます。
const setupMessage = {"role":"system","content":"You are an AI assistant that helps people find information."}Azure OpenAIの設定値は.envから取得するようにしています。
実際の.envサンプルは以下になります。
MicrosoftAppType=
MicrosoftAppId=
MicrosoftAppPassword=
MicrosoftAppTenantId=

AZURE_OPENAI_API_KEY=<Your Azure OpenAI Key>
AZURE_OPENAI_ENDPOINT=<Your Azure OpenAI Endpoint>
AZURE_OPENAI_DEPLOYMENT_NAME=<Your Azure OpenAI Deployment Name>
AZURE_OPENAI_MODEL_NAME=gpt-35-turbo (version 0301)
実際に動かしてみる
以下コマンドで開始します。
PS> npm start
> my-chat-bot@1.0.0 start
> node ./index.js
(node:16420) [DEP0111] DeprecationWarning: Access to process.binding('http_parser') is deprecated.
(Use `node --trace-deprecation ...` to show where the warning was created)
restify listening to http://[::]:3978
Get Bot Framework Emulator: https://aka.ms/botframework-emulator
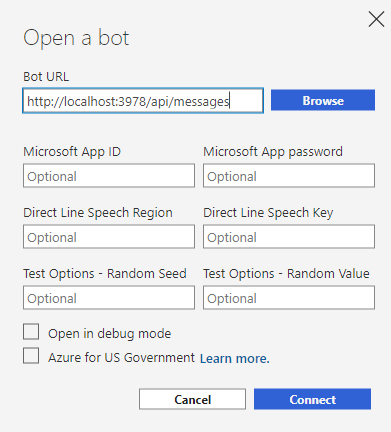
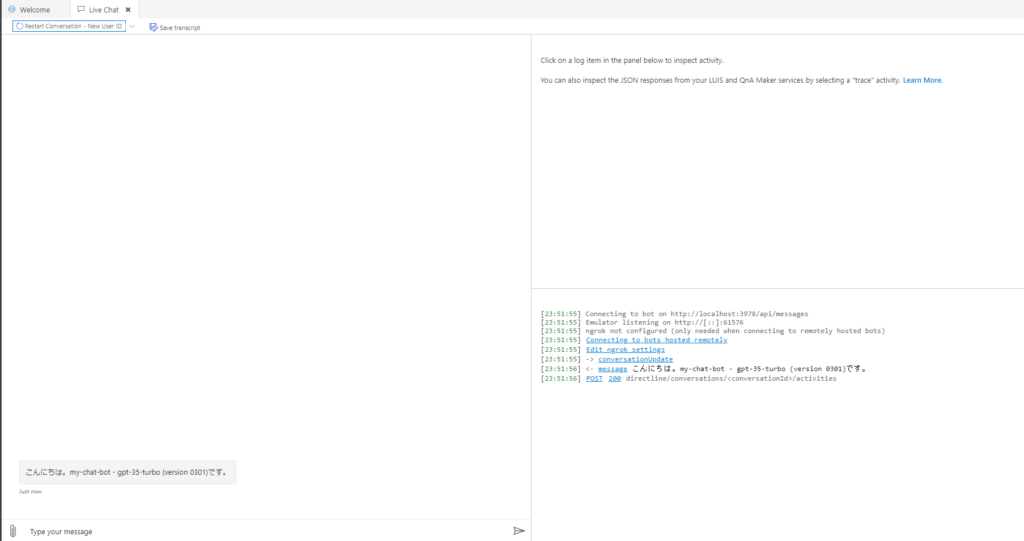
To talk to your bot, open the emulator select "Open Bot"コンソールを見てわかる通り、ポート3987で待機していることが分かります。
このポート番号に対してBot Framework Emuratorで接続してあげればローカルでの動作確認が可能です。
Bot Framework Emuratorを起動します。以下のように接続URLを入力します。
無事に接続が完了すると以下のようにWelcomeメッセージが表示されます。
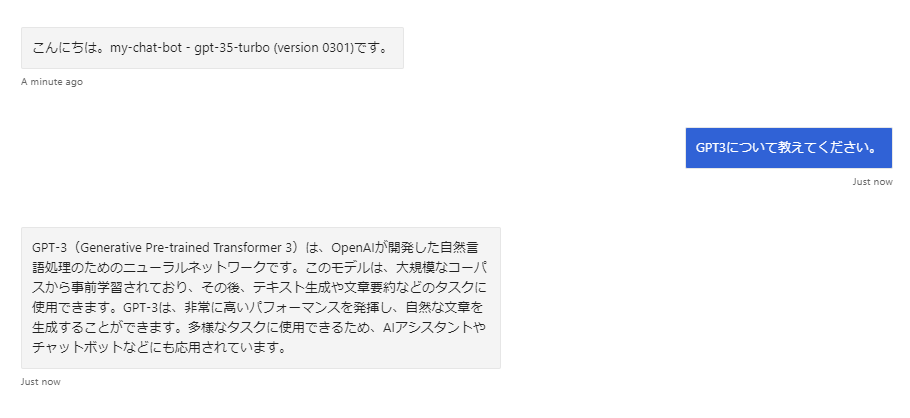
実際に質問を投げかけてみると以下のように返答してくれます。
Azure OpenAIとの接続は問題無さそうです。
まとめ
以上でコードを書いて、ローカルでの動作確認まで出来ました。
次記事ではこのコードをAzureにデプロイ、Teams等での動作確認を行います。